Today Janet Jerger, the founder of Dance Teacher Press gives tips on preparing children for dance performances and recitals.
Your young dancers can perform their recital dances without help, and they can be evenly spaced while doing it.
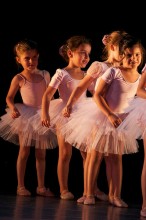
You may find this hard to believe, but I’ve seen it with my own eyes. Studio owner, Shelly Smetter has been teaching the youngest of our dancers for 35 years and her students always perform with confidence.
I know, that you know, that knowing dances and keeping proper spacing is part of every good show, not to mention part of learning to be a good dancer. But I also know you, as a teacher, sometimes struggle to make it happen for your students.
Each Spring I attend recitals in our area, and each year I notice pre- and early primary school children dancing with their teachers or assistants on stage. I see moms and dads and grandparents struggling to get a good view of their precious dancer, who keeps disappearing behind some other grandparent’s precious dancer.
Here is Shelly Smetter’s recipe for success with this loveable, but challenging age group:
Set a temperature of consistency.
With discipline, prepare and plan ahead.
Finally, follow these steps faithfully:
Subtle Space Training
Remember, lines are still new to your youngest dancers and do not come naturally to most children. Assign dancers to their spot in a line at the start of the first semester to get them acquainted with this formation. To keep things fair, exchange lines front to back during your classes.
Give new assignments to students for the second semester. These are their recital lines. Make a thoughtful plan for your line-up so you won’t have to change it later.
During class, as your students practice their steps, they will invariably clump up. Shelly solves this problem by consistently moving through the class, returning children to their spots as she encourages, “Good job, you kids did a really nice job remembering the step.”
When students have finished a run-through of their dance, she gives corrections like, “Reach your arms out straight on count eight,” all the while, gently guiding them back to an evenly spaced line.
What Shelly does not do, is harp on spacing.
Making Their Mark
Surely, you may be thinking, Shelly uses an elaborate system of floor markings to ensure students keep their spacing intact.
Not at all. No numbers. No color-coded GloTape. No hearts, stars, or colorful characters.
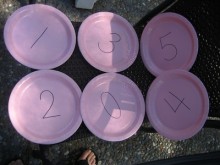
During the first part of the year, use eight, brightly colored Styrofoam plates and write the numbers 1-8 on the back of them. Position them “downstage” below the mirror in the studio. Stand each child in the front row in front of an assigned number. Place the children in the back row within ‘the windows,’ or spaces between each front-row dancer.
After a few weeks your students will be able to find and keep their spacing without the plates.
When the children begin again during the second semester with their new recital places, bring out the plates again until the children don’t need them any longer.
Transitioning to the Stage
As mentioned, there are no elaborate floor markings needed in the studio or on stage. That’s not to say there are no floor markings at all.
In fact, Shelly uses two Xs on the floor at the studio, recreated with tape on the stage of the theater.
One small X is at center stage. The student in the class who is center of the second line (or center line, if more than two lines) tends to gauge herself by this mark. It is also thought of as the center for circle formations. Another small X is placed center and very downstage, almost on the apron. In the studio, this is right below the mirror.
These two center markings are adequate as guides when the rest of Shelly’s spacing system is applied.
As for the adjustment to a mirror-free stage, covering the studio mirrors has proven most effective. Little ones often are disoriented when turned around to face the back of the room and precious time is wasted in this practice.
How or with what to cover your mirrors will depend upon your space. We’ve used newspaper and shower curtains. Some studios opt to permanently affix curtains to the wall or ceiling.
Either way, it’s a good idea to cover your mirrors at least 2 weeks before the performance.
Entering In Style
Recital entrances are a coordinated effort.
Shelly makes lists for stage parents/helpers that give the line order for the first line, second line, etc. of students, and whether they are stage right or left. These helpers are instructed to put the children in their lines while still in the dressing rooms and walk the children backstage in order. Dress rehearsal helps teach the mothers about stage right and left.
For students under 6 years old, plan a black out or dimmed lighting and walk children to their places on stage. Make sure the first line is spread evenly and the second line stands in “the windows”. With one helper leading the front line and another leading the back, the children arrive quickly in position and the show can move along.
For second graders (ages 7-8), a blackout is no longer needed. Let the first line enter on their own, followed by the second line for a more accurate formation.
The way the children enter may vary based on the style of dance being performed. Tap dancers might walk on with hands on their hips, while ballet students may do a polka step to the music or run to their places. Whatever the choice, keep it simple.
By third grade (8-9 years old) your students will have mastered entering into an evenly spaced formation. At this age, any step could be used to get them to their spots.
Sure Of Their Steps
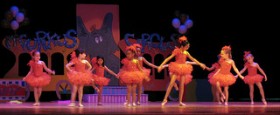
Kindergartners (ages 5- 6) are very capable of performing a tap and ballet dance of two or 2 ½ minutes each. Older students may be able to handle a slightly longer dance.
Begin learning the dances about 20 weeks before the recital. For an end-of-May performance, this means starting right after the New Year.
Teach one 32-count combination every two weeks. The first week is for introducing the combination, which is reviewed and practiced some more during the next week. Every other week you will be adding to their dance.
Most dances will include about eight, 32-count phrases. If you do the math, that allows 16 weeks for learning the dance and four weeks for polishing it, practicing the stage entrance and exit, and possibly protocol for the production finale.
Will every dancer’s performance be flawless? No.
Will some classes need an occasional hint from the wings? Sure.
However, Shelly’s methods really do get the children out on stage, performing the dance on their own, and looking well rehearsed by recital time.
Now you can give your students this gift of confidence, too.
How do you prepare your little dancers for performances?
Author and illustrator Janet Jerger is passionate about sharing her love of ballet with students. As a dance educator in the Midwest for over 30 years, Janet has thrived on encouraging her students to be their best. As the ballet mistress at Shelly’s School of Dance she has enjoyed creating story ballets to showcase her students such as; Sleeping Beauty, Peter Pan, and Alice in Wonderland. As the owner of Dance Teacher Press she has enjoyed creating educational teaching tools such as; books for students and teachers, dance posters, ballet and tap flashcards, coloring sheets, bookmarks and more.

Dance Advantage welcomes guest posts from other dance teachers, students, parents, professionals, or those knowledgeable in related fields. If you are interested in having your article published at Dance Advantage, please see the following info on submitting a guest post. Read posts from guest contributors.
